Tuesday, September 25, 2012

Pumpkin Spice Blossoms


I love fall. It is by far my favorite season. The leaves changing colors, the ability to wear jeans again (LOL) and of course, everything PUMPKIN related. My husband loves pumpkin, so I love trying new things that involve pumpkin as an ingredient.  So for last weeks PITT home game, I decided to make Pumpkin Spice Blossoms. I know I usually call these like 'Kiss' cookies, but I guess Blossom is the correct term.
Cookie Ingredients

So here is the back story on these cookies. A while back (like last year) there was a recipe I saw on Pinterest for Chai Pumpkin Spice Thumbprints. They used these Pumpkin Spice Hershey Kisses that I had never seen. I knew if I did ever find them in a store, I was definitely going to try a cookie with them. And find them I did! However Chai, or really anything tea related, is not my cup of tea (HAHA).  So I decided to make a pumpkin cookie topped with a pumpkin spice kiss. I also went the easy route by adding Pumpkin to Betty Crooker Sugar Cookie Mix. I adore her mixes. I've never had one that wasn't totally yummy.

The first step is to soften your butter. Once your butter is softened add the sugar cookie mix, pumpkin, pumpkin pie spice and your egg.
Blend well until all ingredients are combined. The batter was very moist, so it was good that I was planning on refrigerating it before rolling the dough into balls.  After overnight refrigeration, my dough looked like the below picture.


Now, after your dough has been refrigerated you can start on the topping for the cookies.
Cookie Topping Ingredients

Before you even take the cookie dough out of the fridge, you want to unwrap and freeze the Pumpkin Spice Kisses. I froze them for about 45min. You do this because they melt A LOT faster than chocolate kisses (I discovered this after about 45min in the car) and you want them to keep their shape. Next you want to mix up the topping you will be rolling your dough in. I know most blossom cookies, like peanut butter ones, are rolled in plain sugar. I thought that would work fine, but I do know that a lot of pumpkin drinks you get at restaurants (like martini's and beers) come with a cinnamon sugar rim. So I decided to try cinnamon sugar! It's really easy. You take cinnamon, white sugar and mix! It should look like the below picture. I started with about a 1/4 of a cup of white sugar but it seemed like too little to me so I went with a half a cup.


Take your dough out of the fridge. Take small amounts and roll into a ball.  My dough was still a bit sticky, so I pulled out small amounts, coated it in the cinnamon sugar and then formed it into a ball. Place your coated dough balls onto a baking sheet lined with parchment paper.
All set for the oven

Bake in a 350 degree oven for about 11 minutes. Allow to cool for 1 minute before pressing a Pumpkin Spice Kiss into the center of each cookie. They should look similar to the below picture.
ALL DONE

Allow cookies to cool completely. It will take some time for the kisses to set and become firm again.  I put them in the refrigerator to speed up the cooling process. I refrigerated them for a couple hours.  Be very careful moving the tray as the slightest bump can cause the kiss shape to get messed up.
  See how the tops smushed down? I bumped the whole pan putting them in the fridge.

 Recipe:
1 pouch Betty Crocker Sugar Cookie Mix
1 Egg
1 cup Canned Pumpkin (I used Libbys)
1/3 cup Softened Butter
1 Teaspoon Pumpkin Pie spice
1/2 cup White Sugar
2 1/2 TB Cinnamon
30-35 Hershey Pumpkin Spice Kisses (unwrapped)

Blend cookie mix, egg, canned pumpkin, butter and pumpkin pie spice with hand mixer until well combined. Refrigerate overnight.
Preheat oven to 350 degrees
Unwrap and freeze about 30-35 Pumpkin Spice Kisses
Mix together the white sugar and cinnamon.
Take small amounts of dough and roll into balls.
Roll balls through cinnamon sugar mixture.
Place on parchment paper lined baking sheets.
Bake for about 11 minutes
Allow to cool for 1 minute.
Press a frozen Pumpkin Spice Kiss into the center of each cookie.
Allow to cookies to cool completely and Kiss to re-harden. (Refrigeration will speed this up)
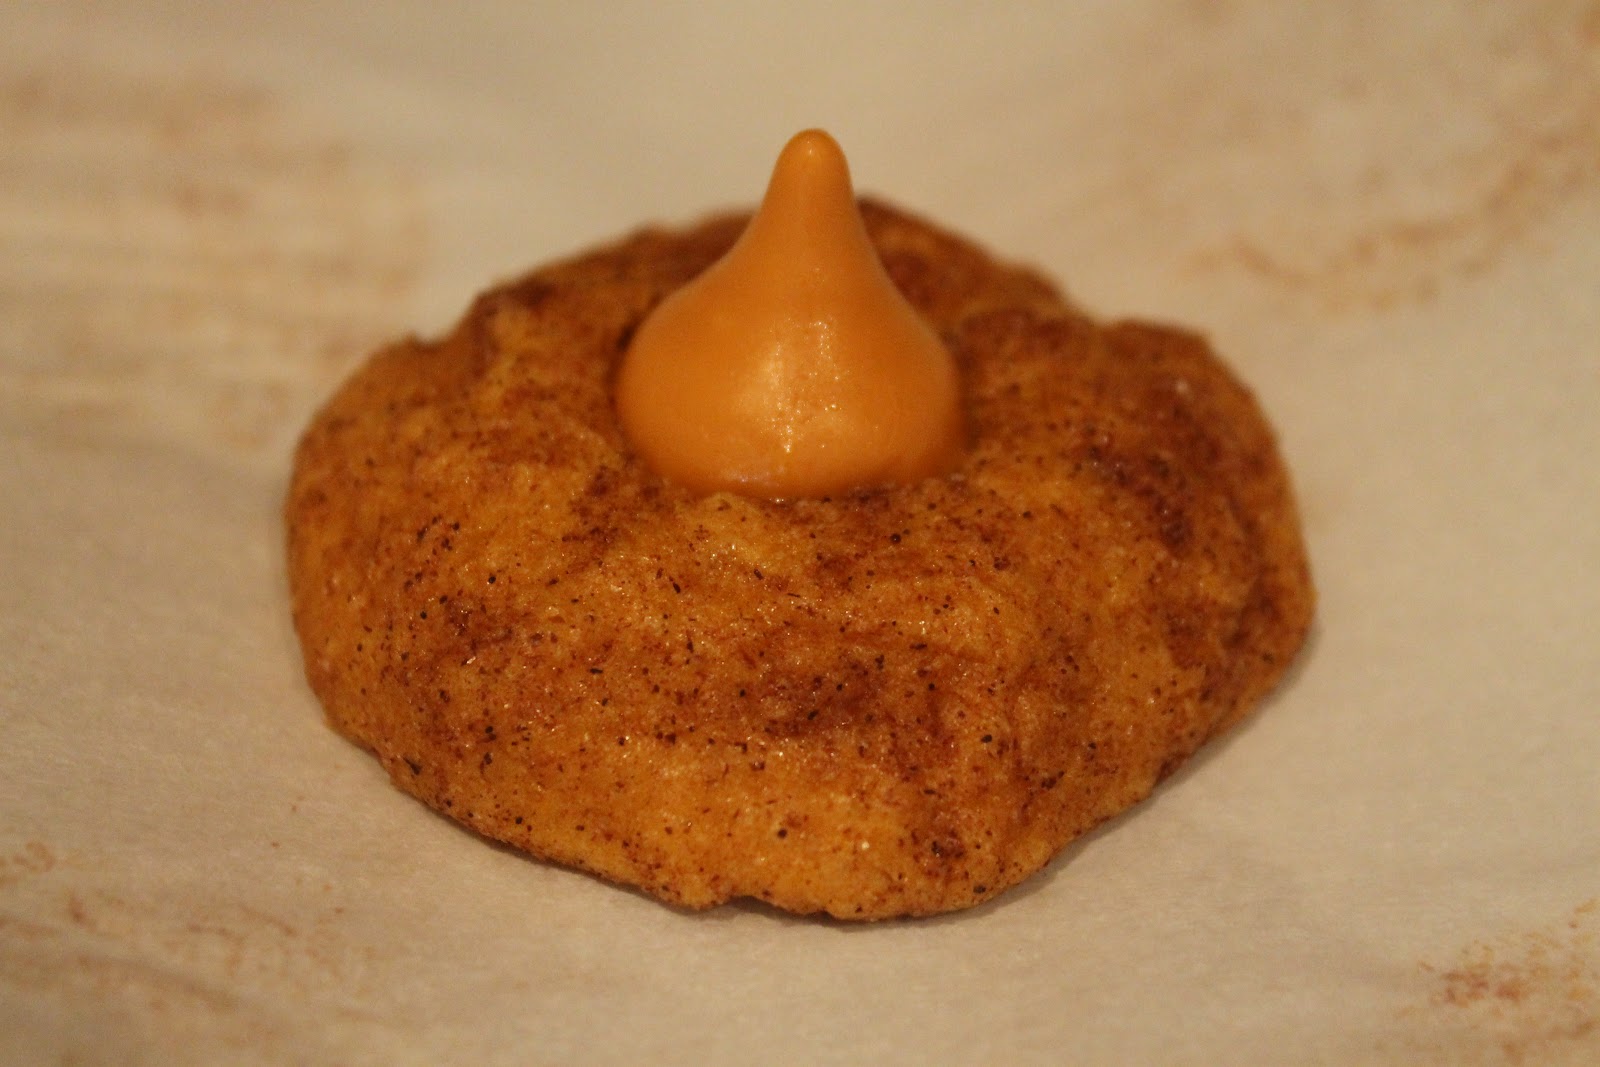
 COOKIE CLOSE UP!

I loved the pumpkin flavor in this cookie and the Kiss really gave it a kick.  The cookie stayed soft and chewy and got a thumbs up from everyone that tried them. I have another recipe to post, but as I am getting ready for my daughter Ariana's FIRST birthday, I may not post again until next week.  Have a great week everybody!

Wednesday, September 19, 2012

Boyfriend Cookies *Updated*


Let me just admit two things right now. The first is I cannot decorate any baked item. I tried my hand at decorated sugar cookies for the last football game (helmets and footballs) and they looked like my 3 year old decorated them. Seriously. So no surprise, I am not blogging about that mess. I know I said in my first post that I would blog regardless. Well, I lied. The cookie came out really good and tasty so if you need a good cookie/frosting recipe I can give you one (though all the credit goes to my cousin Keri), but blogging about DECORATED cookies that look hideous... I couldn't do it. I will MAYBE post a picture of the cookies at the end of this post. The second thing is that I stunk at my picture-taking this week. I don't know what happened. I was halfway through making my next batch of cookies before I remembered to take pictures. I may have to place the blame on my almost 1 year old for my lack of sleep.
Okay, let's get back to the task at hand. The other cookie I made for the PITT/VaTech game are called Boyfriend Cookies.

 Yup, all that went into cookies.

Why are they called Boyfriend cookies do you ask? I have no idea. I assume it's because they think that a 'boyfriend' would like everything you put in them.  They should be renamed MELODYE cookies in that case because I loved these! There is so much candy & chips in this recipe that it has just enough dough to hold it all together. Which is also known as perfection. You start the usual way, with softened butter. Add your sugars and blend until creamy. Then you add the pudding mix, vanilla and eggs and blend in again.  After you have that all mixed in add your flour and baking soda like the below picture.

Once that is all mixed in, you are ready to add your candy and chips. Now as you can see in the below picture, I added them in sections before mixing because I thought it would photograph pretty cool. Doesn't it look cool?

ALL the yummy Mix-Ins.
I would not advise adding them in like that. I would actually put them all in a bowl, mix them together and then add them to the dough. I had a hard time getting a uniform mix because of the way I added everything. I think they cookies ended up ok, but my husband mentioned having a bite that was like all chocolate chips and nothing else. 

Once you have everything mixed in, you are ready to bake. Drop them onto parchment paper using rounded tablespoons. I used a Tablespoon, scooped the dough and then used a spoon to kinda scoop it out so it stayed rounded. These cookies barely spread though and stayed pretty thick (in a good way). Bake them for about 10 minutes in a 375 degree oven or until golden.


Ready for the Oven!


ALL DONE

These cookies were chock full of flavor. Peanut butter, chocolate, white chocolate... Crispy around the edges, and soft in the middle. 

Recipe: (adapted from Everycollegegirl.com)
1 cup Butter (softened) 
1/4 cup Sugar
3/4 cup Brown Sugar
3.4 oz Vanilla Pudding mix (standard size package)
2 eggs
1 tsp Vanilla
2 1/4 cups Flour
1 tsp Baking Soda
12 oz Semi Sweet Chocolate Chips (2 cups)
1/2 cup White Chocolate Chips
1/2 cup Peanut Butter Chips
1/2 cup M&M's (any, I used mini)
1/2 cup Reese's Pieces

Preheat oven to 375 Degrees
In mixing bowl, blend butter and sugars until creamy.
Add pudding mix, vanilla and eggs and blend well.
Add Flour and Baking soda and mix.
Mix in chips and candy until well combined.
Drop by rounded tablespoons onto ungreased baking sheet (I used parchment paper)
Bake about 10 minutes or until golden brown.
Cool Completely.

So I decided to share a pic of my decorated cookies. Here you go:
 Yeah, I know that they at least look like footballs and helmets but on a scale of decorating, these are not that great. But at least they tasted good!
I'm going for a more fall like cookie next and a cookie that uses some of my husbands favorite ingredients. Hope to have those posted soon. In the meantime, enjoy this recipe!

UPDATE 08/26/2014:
So I made these cookies today for my husbands upcoming trip to NY for the first Football game of the season. Just a quick update to this recipe with a different way of mixing the candy goodies.
I put all the M&M's, Reeses Pieces, Chocolate, White and Peanut Butter chips in a separate bowl. 
I gave them a good mix up with a big spoon. 
Just a fun closeup of all the goodies going into the cookies. 
Add to the dough slowly and mix well. It should resemble the above picture.
Finished cookies

Sunday, September 2, 2012

Deep Dark Chocolate Cookies


Happy Football season!!  If you know me, you know that I LOVE making cookies during the football season. It started when I made them for tailgating while going to Boston College football games. Then I started making them for my husband and his co-workers on game day at NC State (due to lack of people to tailgate with LOL). And the tradition continues here for Pitt Football. I always try to make 2 different cookies. For our first home game, I made Oreo Stuffed Chocolate Chip Cookies (check out the recipe HERE) and tried a new recipe for Deep Dark Chocolate Cookies (adapted from Epicurious). These cookies are a totally new territory for me. They are both flour-less and butter-less. Yes you heard that right. I made a cookie that involves NO BUTTER. Flour I can understand, but butter?!?  Well, I felt I had to try this out.

Ingredients

This recipe also involved another first for me: beating egg whites. Yup, you've caught me. I have NEVER beaten egg whites. Probably because I am the type of person that if you hand a lemon meringue pie to, I scrape of the meringue and then eat the pie. Meringue I am NOT a fan of. I've never even tried meringue cookies because the pie topping turns me off SO bad. But, I saw this recipe for cookies that are both very dark chocolatey and FUDGY and well, first time for everything right?
Room Temperature Egg Whites

Ok, back to those egg whites. You will use the egg whites from 3 large eggs. I put the whites into a bowl and then sat the bowl in a pan of warmed water. That brought them to room temperature in about 5 minutes. You could also just let them sit on your counter, but it takes about 30 minutes for them to come to room temp.  I was making these during Ariana's nap time, so I didn't have the extra 30 minutes.  Also, I have heard of people leaving the eggs (whole) on the counter to come to room temp and THEN cracking and separating the whites. Just a note, eggs are a lot easier to seperate when cold. So I would recommend separating the egg whites and then bringing to RT. 

While your eggs are coming to RT, place 1 cup of your chocolate chips into a microwave safe bowl. Now, the recipe called for bittersweet chips, but I used the new Nestle Dark Chocolate Chips because a) I couldn't find bittersweet and b) I've wanted to try these. They worked really well in this recipe.  Once they are in the bowl, pop them in the microwave and microwave for about 1-2 minutes. I did 45 seconds, stirred, 20 seconds more and then they were completely melted. Once your chips are melted, put them aside to cool.  You want them roughly lukewarm; not hot and not cool.

Once your egg whites have come to RT, pour them into your mixing bowl. I used my Kitchen-Aid mixer for this, but a hand mixer would work fine. Start beating them on low speed and then increase the speed once your eggs become frothy.  Beat them for about 5 minutes (may be less depending on your speed) until your egg whites look like the below picture.
I'll admit, the recipe I was following said to beat until your egg whites become or reach 'soft peaks'.  I have no idea what that means. None. So I beat mine until I had some substance and form to it, and where it didn't immediately fall out of the beater when I raised it. This worked for me, but if you know what 'soft peaks' is beat til you reach that.

The next step is adding 1 cup of powdered sugar. You want to add that slowly and beating it into your egg whites on a slow- med slow speed. Once it's all added your mixture should resemble that of marshmallow cream.
See, like marshmallow!

In a separate bowl, whisk together 1 cup powdered sugar, cocoa powder, corn starch and salt. It should look relatively like this:
SLOWLY, beat your dry ingredient mixture into your meringue/marshmallow cream looking mixture. I cannot re-iterate this enough. SLOW, slow, slow. If you add too much, trust me, it gets everywhere. Like it poofs out of the bowl. Once you get it all added and mixed your mixture should now look like the below picture.

Now you are ready to add the remaining chocolate chips and your melted chocolate. Use your [hopefully clean] finger to test the temperature of the chocolate. If it still feels hot, don't put it in yet. If it feels warm, you should be good to go. Add melted chocolate and chocolate chips (recipe called for 1 cup, but I used the rest of the bag) and blend together. Mixture should become stiff.
Adding melted chocolate and chocolate chips
All mixed

Now I guess mine became stiff, but it was still VERY sticky. Making these again, I would maybe pop them in the fridge for a minute or two. As it was, the next step was messy for me.
Put your remaining 1/2 cup powdered sugar on a plate. Roll about 1 tablespoon of dough into ball and then roll through sugar. Place on parchment paper lined cookie sheet. If you don't have parchment paper, just grease your cookie pan. Repeat with remaining dough.  Bake at 350 degrees for 10min or until tops of cookies crack.
In the oven

Your cookies should look like the below picture when they are done.  Cool on the cookie sheets on top of a cooling rack about 10 minutes. Then remove the cookies from cookie sheet to cool completely. 
 DONE

These cookies really surprised me. The flavor was unbelievable. If you've ever had Chocolate Chess Pie or Chocolate Fudge Pie, you will love these. They were crispy on the outside but super fudgy on the inside. They tasted like brownies (or just like the pies I mentioned). The dark chocolate chips worked really well in my opinion. The chocolate was super dark, intense and just WOW. I was really impressed with this meringue based cookie.  Oh and just so you believe me, here is a picture of the middle of the cookie. 
See????? FUDGY!


Recipe:
1 10oz bag Nestle Dark Chocolate Chips
3 large egg whites, room temperature
2 1/2 cups powdered sugar, divided
1/2 cup unsweetened cocoa powder
1 tablespoon cornstarch
1/4 teaspoon salt


Preheat oven to 350 degrees
Line cookie sheets with parchment paper (or grease)
Melt 1 cup chocolate chips (microwave about 2 minutes stirring about 1/2 through), set aside
Using mixer, beat whites in large bowl to soft peaks. 
Gradually beat in 1 cup sugar. 
Continue beating until mixture resembles marshmallow creme. 
Whisk 1 cup sugar, cocoa, cornstarch, and salt in medium bowl. 
On low speed, beat dry ingredients into meringue. 
Stir in lukewarm chocolate and 1/2 cup chocolate chips.
Place 1/2 cup sugar on plate. 
Roll 1 rounded tablespoon dough into ball; roll in sugar, coating thickly. 
Place on prepared sheet. 
Repeat with remaining dough.
Bake until puffed and tops crack, about 10 minutes. 
Cool on sheets on rack 10 minutes.
Remove cookies from sheets, place on racks to cool completely.  


Hope you enjoy this recipe and the football season! More cookie recipes to come in a couple weeks. =)