Friday, November 8, 2013

Gluten Free Pumpkin Chocolate Chip Cookies


My husband pretty much likes everything Pumpkin.  Every year on his birthday, I've been trying to make him something with pumpkin. I've made Pumpkin cookies, pie, ice cream, French toast.. Well this year, I had a bit of a conundrum as he has decided to cut back on wheat a bit (yes, it's like the bane to my baking existence). So to be supportive, I decided to try my hand at a gluten-free pumpkin cookie. Looking at recipes online was pretty disappointing. I found it very hard to find a decent gluten free recipe. Unless a cookie is meringue based (like my deep-dark-chocolate-cookies), the recipes I found included tons of ingredients I had never heard of and had no idea where to find, like Xanthan Gum. Umm no thanks.
In all my researching, I found that using canned pumpkin can replace the egg and oil you would use when making a cake. I also found a recipe where a girl used gluten free cake mix to make cookies. SCORE!
Ingredients
 

Another thing I loved about this recipe, is that you dump everything in a bowl all at once. I always do the chips last, so you put the cake mix, pumpkin, pumpkin spice and vanilla in a big bowl and mix well.
Ready for mixin'
All mixed!
Once you have mixed all the ingredients you are ready to add your chocolate chips.  Now, I am a big lover of chocolate chips. I always add more than a recipe calls for, but you can add as much or as little.. or omit them all together. These cookies would still taste delish without them.
Loads of chocolate Chips
 
Once your chocolate chips are incorporated, you are ready to start baking. Now, any pumpkin cookie I have made has baked in the exact same shape as when it was dropped onto the cookie sheet. So you don't have to worry about spreading with these. Make sure your cookie sheets are covered in parchment paper as these can stick a bit. Drop dough by the spoonful and bake in a 350 degree oven for about 10min.
In the oven
All done
 
Allow them to cool completely and store them in an airtight container.  These cookies stay soft and they taste SO good. You wouldn't even know they are gluten free!
 
Recipe:
1 box Betty Crocker Gluten Free Cake Mix (yellow)
1 can Pumpkin (pure not pie filling)
2 tablespoons Vanilla
2+ teaspoons Pumpkin Pie Spice (add more if you like, it's egg free so taste!)
1 Cup or more Semi Sweet Chocolate Chips
 
Preheat oven to 350 degrees, line cookie sheet with Parchment paper
Mix all ingredients but chocolate chips in large bowl.
Add Chocolate Chips and mix in
Drop by the spoonful onto cookie sheet
Bake for 10min.
Cool completely and enjoy!
 

Wednesday, November 6, 2013

Halloween Candy Cookies


Did anyone else end up with TONS of Halloween candy this year? Now that I have two little munchkins that can Trick or Treat, we ended up with a lot of candy. And we only did two streets!
Sophia the First & Minnie Mouse
 
Sorry, I couldn't help sharing a picture of my Trick or Treaters.   With all the candy we had, I wanted to do something fun with it so that I didn't end up coming home with a ton.  I thought cookies would be a good idea since the kids love them and they can help.

I used a basic chocolate chip cookie recipe, but left out the chocolate chips.  Start with softened butter, add your sugar and brown sugar and mix until creamy.
Creamed butter and sugar

Then add your eggs and vanilla and mix well.  Then add all of your dry ingredients.
All the dry ingredients
 
Once that is mixed, you can start breaking up your candy.  Now you can incorporate your candy two ways. You can mix it into your dough or you can top your dough with the candy.  We went with the latter for two reasons. The first, is that my niece doesn't like chocolate. So we didn't want to mix in a bunch of chocolate candy and have her not eat any. The second, is that if you top your cookies with the candy, it's easier for the kids to help.
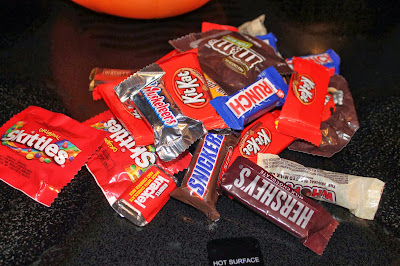
Just some of the candy we used
 
You want to break up the candy to make it easier to top the cookies with. Obviously stuff like M&M's and Skittles don't need to be broken up.  I put pretty large amounts of dough onto a cookie sheet and then let the girls 'decorate' the cookies.
Pretty sure they were eating more than they were putting on cookies
Layla putting her Skittles on cookies
 
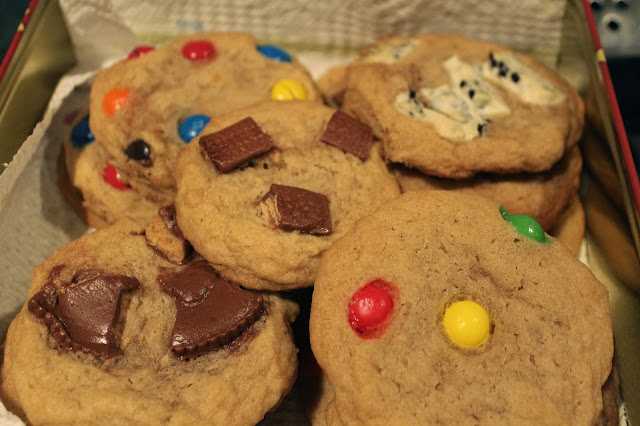
We ended up using M&M's, Skittles, Reese's, Crunch bars, Kit Kats, Hershey Bars (Milk, Dark and Cookies & Cream), Milk Duds and Whoppers. The only candy I wouldn't recommend would be the Whoppers. They came out ROCK hard in the cookies. Everything else worked pretty well. I actually even stuffed two cookies with milk duds. Those came out pretty good too. Not as soft as Rollo's would have been though.
First batch ready for baking
 
Second batch
 
You want to bake them at 375 for about 9 min. If they are too soft you can leave them in longer but you want to watch them closely to make sure the chocolate does not burn.
First batch done
 
You want to let them cool for a while as the candy will take a bit longer to set. Plus I was worried about some of the candy, like the skittles and milk duds, being really hot. So I made these before dinner and then made the kiddos wait until after to eat them. Worked perfectly!
 
Recipe:
2 sticks softened butter
3/4 cup white sugar
3/4 cup packed brown sugar
1 tsp vanilla
2 eggs
2 1/2 cups flour
1tsp baking soda
1tsp salt
Lots of Halloween Candy (broken up)
 
Mix butter and sugars until creamy
Add vanilla and eggs and mix well
Add dry ingredients, mix completely
Drop large spoonfulls onto baking sheet
Top with candy
Bake in a 375 degree oven for 9-11min
Cool completely


Monday, November 4, 2013

Minnie Mouse Cookie Cups


I'll admit it. Sometimes I find cake and cupcakes for birthday parties... Boring. When we were planning my daughter Ariana's 2nd Birthday party, I wanted to do something different.  Besides, aside from the frosting, I don't know how much into cake she really is.  She loves cookies and thought a fun idea would be to make cookie cups. My mom used to make cookie cups, and I've always loved them.
Ingredients
 
Now my daughter is OBSESSED with all things Minnie Mouse. She loves her. I'm sure she likes Mickey too (she does love MMC), but not to the extent of Minnie. I saw a post on Pinterest that was Minnie Mouse cupcakes. So I decided to try my hand at MM Cookie Cups.  I used all pre-made, store bought ingredients since I am always in a crunch for time. But you could totally use homemade ingredients. Except for the Oreo's.. There is no substitution for Oreo's ;0)

 
The first step is making your cookie cups. I was out of PAM so I used butter and a bit of flour to grease my muffin pan.  I also did not use cupcake liners as they do not work very well with cookie dough (live and learn). You want to make sure it is well and greased so the cookies come right out of the pan. 
 
Once you are all greased, take small amounts of cookie dough and press into your muffin cups. You want to spread the dough up the sides so that it makes a cup like indentation like below.
Repeat until all your dough is used up. I used about 1 1/2 tablespoons of dough per muffin cup. I also used an average sized muffin tin.
All Ready for the Oven


Once your muffin cups are full, bake in the oven according to package directions (or recipe directions if you are doing homemade). You don't want to take out early, as gooey cookie cups will not be able to be taken out of the pan once they are cool. Plus, gooey cookies will have a lot of trouble holding up frosting. You want them to be golden brown with a little bit of lightness in the middle. Now they will puff up while baking (see below) but that's fine.
All baked!
 
You want to let your cookies cups cool completely.  While they are cooling, the middles will sink in a bit, giving you the 'cup' shape. Which allows for more frosting of course. To remove them from the pan, I twist them slowly and then pull them out. If one doesn't spin easily, I slid a knife around the edges very carefully as to not cut off the bottom.
After cooling
Now you are ready to decorate!  I used both vanilla and chocolate frosting for these. The problem I had with the chocolate frosting, was that the Minnie Mouse bows I was putting on didn't show up (note to self, make sure you do not buy iridescent pink decorating frosting), so the chocolate ones became Mickey Mouse ones.
 
So you first want to put on your frosting. As Vanelope says in Wreck-It Ralph (one of Ariana's favorite movies), "A buttload of frosting!" You want to fill the indentation and have enough to hold on an Oreo and 2 mini Oreos.  After you apply your frosting, place one Oreo for the head, and 2 mini Oreo's for the ears and press into the frosting.  Then pipe on your Minnie Mouse bow. The next problem I had with that awesome pink iridescent frosting was that it did NOT show up on the Oreos.
See? Yeah, I didn't think so.
 
So I wiped that off and put the bows onto the vanilla frosting. It came out much better, though a little disjointed. 
Our chip & dip bowl has now become my cupcake platter
 

Like most of my recipes, this was really easy to do and assemble.  Plus the birthday girl loved them.
 
Recipe:
1 roll refrigerated chocolate chip cookie dough
1 tub chocolate frosting
1 tub vanilla frosting
1 pkg Oreo's
1 pkg Mini Oreo's
1 tube pink decorating frosting
 
Preheat oven according to cookie dough directions
Grease muffin tin thoroughly.
Press about 1 1/2 TBS of cookie dough in to muffin cups. Press down in the middle and spread up the sides a bit.
Repeat until you run out of dough.
Bake according to dough package instructions.
Allow to cool completely.
Remove from tins CAREFULLY.
Frost cookie cups.
Top with one regular sized Oreo for the face and 2 mini Oreo's for the ears.
Pipe on Minnie's Bow.
Eat and enjoy!
 
Birthday girl enjoying her Minnie Mouse Cookie Cup (or just the Oreos)