Friday, December 6, 2013

Reese's Stuffed Chocolate Peanut Butter Fudge


I hope everyone had a great Thanksgiving! I made a total of 4 desserts as my contribution to my 2 Thanksgiving dinners. Two were new and two (my GF Pumpkin Chocolate Chip Cookies, Mel's Famous Fudge) were desserts that I had made before.  Now I should admit that making four desserts all in one afternoon made me a bit scattered and I forgot to take my step by step pictures.  The steps to this recipe is almost exactly like my original fudge, up until you are pouring it into the pan. And the ingredients are different of course.

Ingredients
 

 I find fudge really easy to make. It's just a but labor intensive as you have to watch it constantly and there is a TON of stirring.  The first thing you do is prepare your pans. I used a large metal pan, like a 9x13. I sprayed it pretty generously with Pam so that my fudge would come out of the pan. Just make sure it is greased well.  Then you can start making the fudge! Melt your butter in a large saucepan. Once it's melted, add 10oz of evaporated milk and stir to combine.  Then you add your sugar.
Dumped all the sugar in
 
It's easier to add the sugar slowly, but as I mentioned, I was kinda in a rush. So I dumped it all in at once. It just makes it harder to stir in, but not impossible. And yeah, this was the last picture I took until it was all done. Sorry.
Anyway, you stir the sugar while slowly (emphasis on the SLOWLY) bringing it to boil. You want the sugar to dissolve.  You have to stir constantly to make sure it doesn't burn.  Once the sugar has dissolved (and I typically check the spoon to see if it has dissolved), remove the pan from heat and immediately add your peanut butter & chocolate chips. Stir until melted and then add 3/4 of the container of marshmallow Fluff. Stir until the fluff is totally incorporated. 
 
Once it's all mixed, pour half the fudge into your prepared pan. Quickly press your Reese's into the fudge. I find it easier to have them already unwrapped.  I used Reese's trees because they were on sale at the store, but any Reese's would work.  Once you have them on, quickly pour the rest of the fudge over the Reese's, making sure to cover them. I used the spoon to lightly spread the fudge over the top.

 All done!
 
You want to leave the fudge to cool completely. It will need extra time, because it takes a while for the chocolate on the Reese's to set. I actually popped it in the fridge so that it would set faster. I have actually never done that before with fudge, and it turned out great.  I had it in the fridge for about 15-20min and it set enough that I was able to cut it into squares easily.
 
I would recommend keeping it stored in a airtight container as fudge, once its been cut into, tends to get hard pretty fast. I kept this in a Tupperware container and it stayed pretty soft.
 
Recipe:
1 Stick butter
10oz Evaporated Milk
5 Cups sugar
2 12oz bags of Peanut butter & chocolate chips (or one bag peanut butter one bag chocolate)
3/4 16 oz container of Marshmallow Fluff
Reese's  I used about 16-18 mini trees.
 
Melt butter
Pour in and stir 10oz of Evaporated milk
Stir in 5 cups of sugar
Bring to a boil while stirring constantly until sugar is dissolved.
Remove from heat
Stir in Peanut butter and Chocolate chips until melted
Stir in 3/4 of the marshmallow fluff until combined
Immediately pour half the fudge into a greased pan
Press Reese's into fudge
Cover with the remaining fudge
Allow to cool and set completely and then cut into squares.
Store in airtight container. 


Friday, November 8, 2013

Gluten Free Pumpkin Chocolate Chip Cookies


My husband pretty much likes everything Pumpkin.  Every year on his birthday, I've been trying to make him something with pumpkin. I've made Pumpkin cookies, pie, ice cream, French toast.. Well this year, I had a bit of a conundrum as he has decided to cut back on wheat a bit (yes, it's like the bane to my baking existence). So to be supportive, I decided to try my hand at a gluten-free pumpkin cookie. Looking at recipes online was pretty disappointing. I found it very hard to find a decent gluten free recipe. Unless a cookie is meringue based (like my deep-dark-chocolate-cookies), the recipes I found included tons of ingredients I had never heard of and had no idea where to find, like Xanthan Gum. Umm no thanks.
In all my researching, I found that using canned pumpkin can replace the egg and oil you would use when making a cake. I also found a recipe where a girl used gluten free cake mix to make cookies. SCORE!
Ingredients
 

Another thing I loved about this recipe, is that you dump everything in a bowl all at once. I always do the chips last, so you put the cake mix, pumpkin, pumpkin spice and vanilla in a big bowl and mix well.
Ready for mixin'
All mixed!
Once you have mixed all the ingredients you are ready to add your chocolate chips.  Now, I am a big lover of chocolate chips. I always add more than a recipe calls for, but you can add as much or as little.. or omit them all together. These cookies would still taste delish without them.
Loads of chocolate Chips
 
Once your chocolate chips are incorporated, you are ready to start baking. Now, any pumpkin cookie I have made has baked in the exact same shape as when it was dropped onto the cookie sheet. So you don't have to worry about spreading with these. Make sure your cookie sheets are covered in parchment paper as these can stick a bit. Drop dough by the spoonful and bake in a 350 degree oven for about 10min.
In the oven
All done
 
Allow them to cool completely and store them in an airtight container.  These cookies stay soft and they taste SO good. You wouldn't even know they are gluten free!
 
Recipe:
1 box Betty Crocker Gluten Free Cake Mix (yellow)
1 can Pumpkin (pure not pie filling)
2 tablespoons Vanilla
2+ teaspoons Pumpkin Pie Spice (add more if you like, it's egg free so taste!)
1 Cup or more Semi Sweet Chocolate Chips
 
Preheat oven to 350 degrees, line cookie sheet with Parchment paper
Mix all ingredients but chocolate chips in large bowl.
Add Chocolate Chips and mix in
Drop by the spoonful onto cookie sheet
Bake for 10min.
Cool completely and enjoy!
 

Wednesday, November 6, 2013

Halloween Candy Cookies


Did anyone else end up with TONS of Halloween candy this year? Now that I have two little munchkins that can Trick or Treat, we ended up with a lot of candy. And we only did two streets!
Sophia the First & Minnie Mouse
 
Sorry, I couldn't help sharing a picture of my Trick or Treaters.   With all the candy we had, I wanted to do something fun with it so that I didn't end up coming home with a ton.  I thought cookies would be a good idea since the kids love them and they can help.

I used a basic chocolate chip cookie recipe, but left out the chocolate chips.  Start with softened butter, add your sugar and brown sugar and mix until creamy.
Creamed butter and sugar

Then add your eggs and vanilla and mix well.  Then add all of your dry ingredients.
All the dry ingredients
 
Once that is mixed, you can start breaking up your candy.  Now you can incorporate your candy two ways. You can mix it into your dough or you can top your dough with the candy.  We went with the latter for two reasons. The first, is that my niece doesn't like chocolate. So we didn't want to mix in a bunch of chocolate candy and have her not eat any. The second, is that if you top your cookies with the candy, it's easier for the kids to help.
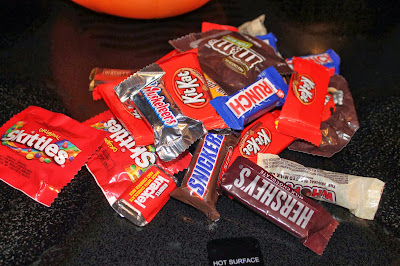
Just some of the candy we used
 
You want to break up the candy to make it easier to top the cookies with. Obviously stuff like M&M's and Skittles don't need to be broken up.  I put pretty large amounts of dough onto a cookie sheet and then let the girls 'decorate' the cookies.
Pretty sure they were eating more than they were putting on cookies
Layla putting her Skittles on cookies
 
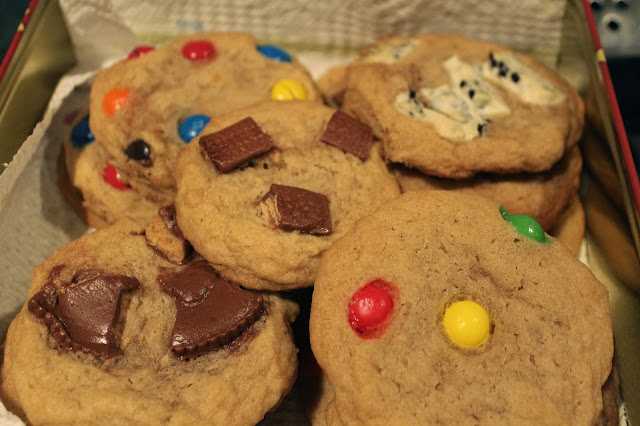
We ended up using M&M's, Skittles, Reese's, Crunch bars, Kit Kats, Hershey Bars (Milk, Dark and Cookies & Cream), Milk Duds and Whoppers. The only candy I wouldn't recommend would be the Whoppers. They came out ROCK hard in the cookies. Everything else worked pretty well. I actually even stuffed two cookies with milk duds. Those came out pretty good too. Not as soft as Rollo's would have been though.
First batch ready for baking
 
Second batch
 
You want to bake them at 375 for about 9 min. If they are too soft you can leave them in longer but you want to watch them closely to make sure the chocolate does not burn.
First batch done
 
You want to let them cool for a while as the candy will take a bit longer to set. Plus I was worried about some of the candy, like the skittles and milk duds, being really hot. So I made these before dinner and then made the kiddos wait until after to eat them. Worked perfectly!
 
Recipe:
2 sticks softened butter
3/4 cup white sugar
3/4 cup packed brown sugar
1 tsp vanilla
2 eggs
2 1/2 cups flour
1tsp baking soda
1tsp salt
Lots of Halloween Candy (broken up)
 
Mix butter and sugars until creamy
Add vanilla and eggs and mix well
Add dry ingredients, mix completely
Drop large spoonfulls onto baking sheet
Top with candy
Bake in a 375 degree oven for 9-11min
Cool completely


Monday, November 4, 2013

Minnie Mouse Cookie Cups


I'll admit it. Sometimes I find cake and cupcakes for birthday parties... Boring. When we were planning my daughter Ariana's 2nd Birthday party, I wanted to do something different.  Besides, aside from the frosting, I don't know how much into cake she really is.  She loves cookies and thought a fun idea would be to make cookie cups. My mom used to make cookie cups, and I've always loved them.
Ingredients
 
Now my daughter is OBSESSED with all things Minnie Mouse. She loves her. I'm sure she likes Mickey too (she does love MMC), but not to the extent of Minnie. I saw a post on Pinterest that was Minnie Mouse cupcakes. So I decided to try my hand at MM Cookie Cups.  I used all pre-made, store bought ingredients since I am always in a crunch for time. But you could totally use homemade ingredients. Except for the Oreo's.. There is no substitution for Oreo's ;0)

 
The first step is making your cookie cups. I was out of PAM so I used butter and a bit of flour to grease my muffin pan.  I also did not use cupcake liners as they do not work very well with cookie dough (live and learn). You want to make sure it is well and greased so the cookies come right out of the pan. 
 
Once you are all greased, take small amounts of cookie dough and press into your muffin cups. You want to spread the dough up the sides so that it makes a cup like indentation like below.
Repeat until all your dough is used up. I used about 1 1/2 tablespoons of dough per muffin cup. I also used an average sized muffin tin.
All Ready for the Oven


Once your muffin cups are full, bake in the oven according to package directions (or recipe directions if you are doing homemade). You don't want to take out early, as gooey cookie cups will not be able to be taken out of the pan once they are cool. Plus, gooey cookies will have a lot of trouble holding up frosting. You want them to be golden brown with a little bit of lightness in the middle. Now they will puff up while baking (see below) but that's fine.
All baked!
 
You want to let your cookies cups cool completely.  While they are cooling, the middles will sink in a bit, giving you the 'cup' shape. Which allows for more frosting of course. To remove them from the pan, I twist them slowly and then pull them out. If one doesn't spin easily, I slid a knife around the edges very carefully as to not cut off the bottom.
After cooling
Now you are ready to decorate!  I used both vanilla and chocolate frosting for these. The problem I had with the chocolate frosting, was that the Minnie Mouse bows I was putting on didn't show up (note to self, make sure you do not buy iridescent pink decorating frosting), so the chocolate ones became Mickey Mouse ones.
 
So you first want to put on your frosting. As Vanelope says in Wreck-It Ralph (one of Ariana's favorite movies), "A buttload of frosting!" You want to fill the indentation and have enough to hold on an Oreo and 2 mini Oreos.  After you apply your frosting, place one Oreo for the head, and 2 mini Oreo's for the ears and press into the frosting.  Then pipe on your Minnie Mouse bow. The next problem I had with that awesome pink iridescent frosting was that it did NOT show up on the Oreos.
See? Yeah, I didn't think so.
 
So I wiped that off and put the bows onto the vanilla frosting. It came out much better, though a little disjointed. 
Our chip & dip bowl has now become my cupcake platter
 

Like most of my recipes, this was really easy to do and assemble.  Plus the birthday girl loved them.
 
Recipe:
1 roll refrigerated chocolate chip cookie dough
1 tub chocolate frosting
1 tub vanilla frosting
1 pkg Oreo's
1 pkg Mini Oreo's
1 tube pink decorating frosting
 
Preheat oven according to cookie dough directions
Grease muffin tin thoroughly.
Press about 1 1/2 TBS of cookie dough in to muffin cups. Press down in the middle and spread up the sides a bit.
Repeat until you run out of dough.
Bake according to dough package instructions.
Allow to cool completely.
Remove from tins CAREFULLY.
Frost cookie cups.
Top with one regular sized Oreo for the face and 2 mini Oreo's for the ears.
Pipe on Minnie's Bow.
Eat and enjoy!
 
Birthday girl enjoying her Minnie Mouse Cookie Cup (or just the Oreos)

Wednesday, October 16, 2013

Cake Batter Blondie Bars


I made these yummy blondie bars as one of the treats for my daughters 2nd birthday. I have a niece and a sister who don't like chocolate (yes, sometimes I think they are from another planet too), so I like having something that is chocolate free that they can eat. These were great, easy and really colorful so they are perfect for a party.
Ingredients


Your first step is to combine the cake mix, oil, egg and milk. Add the milk slowly, as you don't want the batter to liquidy. You want a dense batter. Then add in your sprinkles and white chocolate chips. I had a special helper. And she may or may not have licked the mixer attachments clean.
My happy helper
I used two different types of sprinkles, Rainbow sprinkles and nonpareils. I like the difference in texture and honestly, I like nonpareils more than sprinkles. Don't over mix the sprinkles in as they will start to leach color into your batter. Also, I would recommend not using super dark sprinkles as they will almost immediately color your batter.
 All mixed
Once your batter is all mixed, pour it into a greased baking pan. I was out of Pam, so I rubbed a little butter in the bottom and covered it with parchment paper. The butter is used to keep the parchment paper from moving around (see below).


Pour your batter into the prepared pan. I spread it just a bit so it was even throughout the pan.
Ready to bake

Bake for about 25-30min until edges are just starting to brown. You want them to be gooey in the middle. Allow to cool at least 30min before cutting into bars.
ALL DONE!  

I loved the softness of the batter with the crunch of the sprinkles. I was worried that they would be too sweet, but they really weren't. And everyone really liked these at Ariana's party. Even the chocolate lovers!
Recipe:
1 box cake mix (white or yellow)
1/4 cup canola oil
1 egg
1/3 cup milk (you can use more if needed, do not exceed 1/2 cup)
1/2 cup sprinkles  *I used 1/4 cup sprinkles, 1/4 cup nonpareils
1/2 white chocolate chips
Preheat oven to 350 degrees
Grease baking pan
Combine cake mix, oil, egg and milk. Add milk slowly.
Mix in chocolate chips and sprinkles. Do not over stir.
Pour into prepared baking pan.
Bake 25-30 minutes until edges are just turning brown.
Cool for at least 30 minutes and cut into bars.
Extreme Blondie Bar Closeup!

Friday, September 20, 2013

Crispy Fried Chicken


I have wanted to make fried chicken for a LONG time. It's one of my favorite things to eat (not sure if that's due to growing up in VA or because it's so good). I've always been a little wary of making it, because it seemed like it would be a lot of work and really messy. This does take a fairly long time, but it really wasn't that hard. Mostly, it was a lot of prep work.
 
Ingredients for marinade (minus water)
 
The first step in making this fried chicken is to make your marinade. You add all your ingredients in a big pot (including your halved lemons) and 1 gallon (or 16 cups) of water and bring to a boil. You let it boil until the salt has dissolved.
Marinade
 
Once your marinade is done, you need to chill it so as it doesn't cook your chicken. I popped a couple ice cubes in it and put it in the fridge. I hadn't read this step, so it threw me for a loop. I think it takes about an hour to chill in the fridge. Once it's chilled, put your chicken into the marinade and let sit in your refrigerator for at least 4 hours. After the four hours, rinse chicken, pat dry and lay them out on parchment paper. Allow them to sit for about an hour or until they come to room temperature.
The chicken after it's 4 hour soak
  

 Ingredients for the coating
 
You are now ready to make your mixture for the coating. You need 2 bowls for the coating, and 1 bowl for your buttermilk.  Evenly split your flour and spices between 2 bowls. Add 3 tablespoons buttermilk to one of the bowls until the mixture is crumbly.  Your mixtures should look like the pictures below.
 Crumbly mixture (right)
Dry mixture (left)

 
Set up your bowls as following: Dry bowl, buttermilk bowl then crumbly bowl. Place a parchment paper lined baking sheet next to the last bowl.  Pour your oil into a pan and heat until it reaches 320 degrees. I used a deep fryer thing that my MIL had and a candy thermometer. On a separate baking sheet, place paper towels and a cooling rack on top for the chicken to drain. Now prepare to get messy! Coat each piece of chicken in the dry mixture, then dip into the buttermilk. Allow the excess to drip off, then roll the chicken through the crumbly mixture. Lay on your parchment paper and repeat with each piece of chicken.
Chicken in dry mixture
Coated and ready for frying!
 
Once your oil is heated, drop your chicken in carefully (I had a basket, but if you don't use tongs). I fried 3 drumsticks at a time. Cook 8-10 minutes or until cooked through. I cooked about 9 min and cut into the first pieces to make sure they were done. Use your tongs to take your finished chicken out of the oil and place on the cooling racks.

Chicken getting cooked!
My first finished pieces!
Allow to cool and enjoy!! I served mine with garlic mashed potatoes and peas and this meal was a big hit. I'm actually going to make it again next week, but I might try adding some hot sauce (just a little) for a bit more spice.  I've heard conflicting things about whether to add it to the buttermilk or the crumbly mixture, so if anyone knows the answer, let me know! Oh and wondering if the girls liked it?
Kae loved it ;0)
 
Recipe: (Adapted from The Rookie Cook)
2-3lbs Chicken Drumsticks
For the Marinade
3 lemons, halved
1/3 cup dried parsley
1 Tablespoon dried thyme
1/4 cup honey
2 Tablespoons minced garlic
2 Tablespoons black peppercorns
3/4 cup kosher salt
1 gallon (or 16 cups) water

For the Coating
3 cups flour, divided
2 Tablespoons garlic powder, divided
2 Tablespoons onion powder, divided
2 teaspoons paprika, divided
2 teaspoons salt
1 teaspoon black pepper, divided
2 cups + 3 Tablespoons buttermilk, divided
For Frying
1 Quart Canola Oil (I needed a bit more than that)
 
Combine all the ingredients for the marinade in a large pot.  Bring to a boil stir for about 1 minute, or until salt dissolves.
Remove from heat and chill the marinade (about an hour). Then add your chicken. Chill for about 4 hours.
Take chicken out of marinade, rinse under cold water, and pat dry.  Let sit for 1 1/2 hours, or until it comes to room temperature.
Take out 3 medium sized bowls.  Pour 1 1/2 cups of flour in each, and divide the garlic powder, onion powder, paprika, salt, and pepper equally between the two bowls.
Add 3 Tablespoons of buttermilk to one of the bowls and mix til it is crumbly.
In your last bowl, pour the remaining 2 cups of buttermilk.
Set up your bowls with the dry bowl first, then the buttermilk, than the crumbly mix.  Place a parchment lined baking sheet or pan next to the last bowl. 
 Pour oil in a large pot (you want it several inches deep), and using a thermometer, bring the oil to a temperature of 320°. If using a deep fryer, set to setting for chicken ( I still tested heat with thermometer)
Line a baking sheet with paper towels. Place a cooling rack on top the baking sheet for the cooked chicken to drain.
Coat each drumstick with the dry mixture, then dip in the buttermilk and let the excess drip off.  Then, roll the drumstick in the crumbly mixture and place on the parchment covered baking sheet.  Repeat with your remaining chicken.
Once the oil is heated, carefully lower drumsticks into hot oil and fry for 8-10 minutes, or until chicken is cooked through. 
 Remove chicken from hot oil using tongs and place on prepared cooling rack. 
Repeat with remaining chicken .  
Let cool 10 minutes before serving.
 
Extreme Chicken Closeup